Raspberry Pi 5: A Powerful and Versatile Single-Board Computer
The Raspberry Pi Foundation has long been at the forefront of revolutionizing the world of single-board computing, empowering enthusiasts, educators, and professionals to bring their ideas to life with affordable, versatile hardware. With each iteration, the Raspberry Pi lineup has pushed the boundaries of what's possible, sparking creativity and innovation across diverse fields and communities.
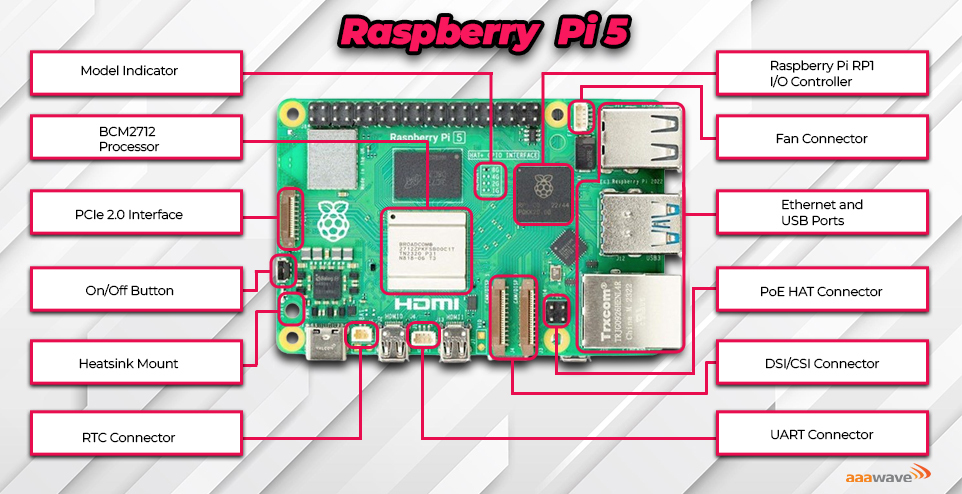
The Raspberry Pi 5 is the latest iteration of the popular single-board computer, and it's more powerful and versatile than ever before. It features a quad-core Arm Cortex-A76 processor running at 2.4GHz, which is up to three times faster than the Raspberry Pi 4. It also comes with 2GB, 4GB, or 8GB of LPDDR4-4266 RAM, which is twice as fast as the RAM in the Raspberry Pi 4.

The Raspberry Pi 5 has a number of other improvements over its predecessor, including:
- Dual USB 3.0 ports, which are four times faster than the USB 2.0 ports on the Raspberry Pi 4
- Dual HDMI ports, which can support up to 4Kp60 displays
- A Gigabit Ethernet port
- A microSD card slot
- A 40-pin GPIO header, which can be used to connect to a variety of sensors and other devices
- A new Broadcom BCM2712 processor, which is more efficient than the processor in the Raspberry Pi 4
What You'll Need:
- Raspberry Pi 5 Board
- MicroSD Card (minimum 8GB)
- Power Supply (USB-C, minimum 3A)
- HDMI Cable
- Keyboard and Mouse
- Display (Monitor or TV)
Step 1: Prepare your Software:
- Download Raspberry Pi Imager: https://www.raspberrypi.com/news/raspberry-pi-imager-imaging-utility/
- Choose your Operating System (OS): Popular options include Raspberry Pi OS (Beginner-friendly) or Ubuntu (More advanced).
- Select your storage (your microSD card).
- Optional: Add Wi-Fi credentials for network setup.
- Click "Write" to flash the OS onto your microSD card.
Step 2: Power Up and Connect:
- Insert the microSD card into your Pi 5.
- Connect the power supply via USB-C.
- Connect the HDMI cable to your display and the Pi 5.
- Plug in your keyboard and mouse.
- Power on your display and Pi 5.
Step 3: First Boot and Configuration:
- Follow the on-screen instructions to complete the initial setup.
- Set your language, location, and keyboard layout.
- Connect to Wi-Fi (if not already configured).
- Change the password for security.
- Update the software to ensure the latest features and security patches.
- Congratulations! You've successfully set up your Raspberry Pi 5.
Step 4: Experiment and Learn:
The true magic of Raspberry Pi lies in experimentation and hands-on learning. Take advantage of the GPIO pins to interface with sensors, LEDs, and other electronic components. Explore programming languages like Python to create your own scripts and applications. The possibilities are limited only by your imagination.
As you embark on your journey with Raspberry Pi 5, remember that learning is a continuous process. Don't be afraid to experiment, make mistakes, and ask questions along the way. With each project and discovery, you'll gain new insights and skills that will propel you further on your path to mastering the world of computing.
Welcome to the exciting world of Raspberry Pi 5. Let the adventure begin!


