

Raspberry Pi 4 is a low cost single-board computer which has powerful Broadcom CPU and choice of RAM. With the Pi 4 you can build your own low-cost PC, smart home devices, game emulation machines, stream 4K videos and even faster networking at the comfort of your own home with a low cost.
It's a powerful platform for building your own hardware and software. The GPIO ports allow you to extend the device with your own and third-party hardware, usually referred to as HATs (Hardware Attached on Top). You can start with Raspberry Pi's own Raspberry Pi OS, a custom version of Debian, that comes preconfigured with basic programming tools and a list of recommended educational and programming tools.
Here are all the details about the new boards, the new features, and what related components you might need
Processor:
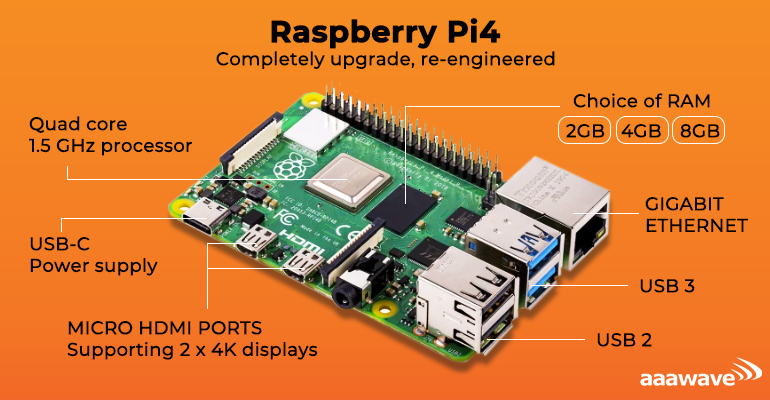
- High-performance Broadcom BCM2711 quad-core Cortex-A72 (ARM v8) 64-bit SoC @1.5GHz
Memory:
- 2GB, 4GB, or 8GB LPDDR4 (depending on model)
Connectivity:
- 2.4 GHz and 5.0 GHz IEEE 802.11b/g/n/ac wireless LAN, Bluetooth 5.0, BLE
- Gigabit Ethernet
- 2 × USB 3.0 ports
- 2 × USB 2.0 ports
Video & Sound:
- 2x micro HDMI ports with resolutions up to 4K – extend your display with a second screen (or add a second sign to your digital signage solution!). Run a single display at 4kp60 or twin displays at 1080p60. Other possibilities could include 4kp60+1080p60 and twin 4kp30.
- MIPI DSI display port and MIPI CSI camera port
- 4-pole stereo audio and composite video port
Multimedia:
- H.265 (4Kp60 decode) and H.264 (1080p60 decode, 1080p30 encode)
- OpenGL ES 3.0 graphics – this could open the door for the Pi to play OpenGL games!
Input Power:
- 5V DC via USB-C connector or 5V DC via GPIO header (minimum 2.5A-3A)
If you've just gotten your first Raspberry Pi 4 and are wondering how to get started? Here's what you need to do.
There are a million things you can do with your mini computer, but first you need to get it up and running.
Accessories for Raspberry Pi 4
A power adapter that outputs at least 5 volts and 3 amps over USB Type-C
A microSD card You can start with as little as 8GB of storage, but 16GB or 32GB is a better option in practice, with Raspberry Pi OS automatically resizing its partitions to fit all sizes of storage.
If all you have is storage and power, then you'll need to do a headless install of Raspberry Pi, where you control the computer remotely via VNC or SSH. Otherwise, you'll also need:
A micro HDMI to HDMI cable (or two) to connect to a TV or monitor. You can connect to two screens simultaneously.
A screen. This could be a TV or a monitor
A keyboard and mouse. You can use wired or wireless peripherals. A wireless keyboard like the Corsair K83, which has a built-in touchpad, is a real space-saver.
Fans or heatsinks. While these are not absolute requirements, they are highly recommended because of all the heat the Raspberry Pi 4 can generate.
A case to protect the Raspberry Pi 4. We recommend getting one that leaves you access to the GPIO pins.
If you're planning on running a Linux desktop, is heat. The Pi 4's processor can run hot under load, so we'd recommend using a fan or a heatsink case.
You might need some following accessories:
A HAT, such as the Raspberry Pi Sense HAT, servo HAT or the Unicorn HAT, which enables extra functionality.
A camera module, preferably the Raspberry Pi High-Quality Camera.
Install Raspberry Pi OS using Raspberry Pi Imager
Raspberry Pi Imager is the quick and easy way to install Raspberry Pi OS and other operating systems to a microSD card, ready to use with your Raspberry Pi.
Download and install Raspberry Pi Imager to a computer with an SD card reader. Put the SD card you'll use with your Raspberry Pi into the reader and run Raspberry Pi Imager.
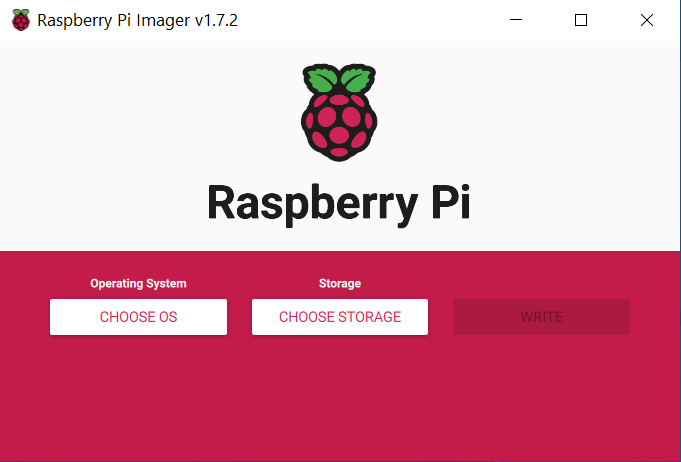
Click Choose OS in Raspberry Pi Imager and then click choose storage. After that, click Write. The app will now take a few minutes to download the OS and write to your card.
Configuring Raspberry Pi OS
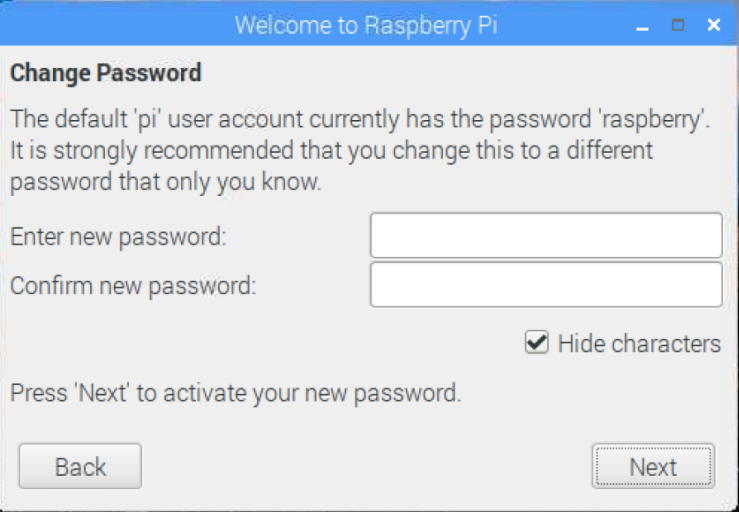
The default username is "pi", and the password is "raspberry". You can set your own username and password. On first boot, you will probably be given a "Welcome to the Raspberry Pi" dialog box, which takes you through the process of choosing important settings.
Click Next on the dialog box and then select your country, language and keyboard type.

Change your default password or you can leave it blank for it remain as "raspberry."
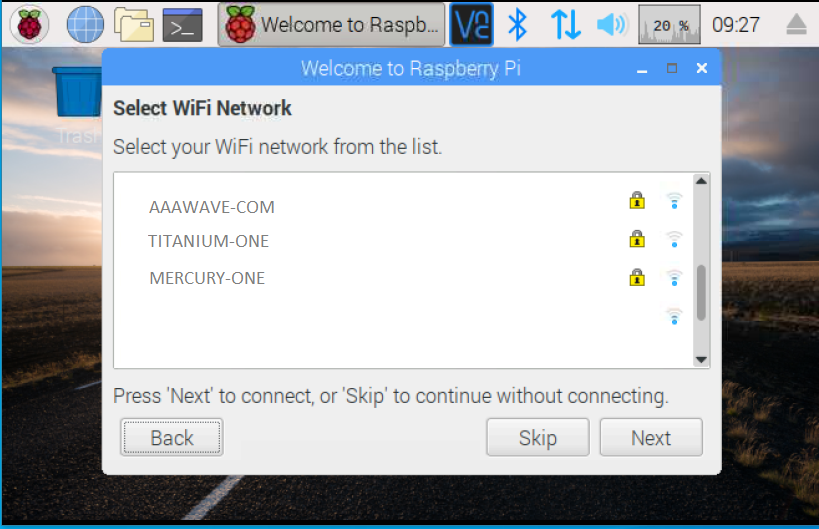
Select the Wi-Fi network on the screen after, provided that you are connecting via Wi-Fi.
Once your wireless network is configured and your Raspberry Pi has access to the Internet you will be prompted to update the operating system to the latest version. This will automatically download any patches and updates needed to bring your new operating system right up to date.
Once the operating system is updated you will be prompted to reboot your Raspberry Pi.
